Painting is an art that continues to evolve based on the creativity mindset of an individual. The same applies when it comes to maintaining a fantastic look and feel of the room. You can regularly change the paint colors of your floor at will, and there is no limit to your innovativeness. There are numerous other things you could do like
 Using stencils or painter’s tape on chalkboards to make unique designs, geometric patterns, stripes and motifs.
- Set off spaces in the room with borders or painted throw rugs.
- Anchor bright areas or brighten up darker spaces.
- Renew the old look of your floors with only a fraction of refinishing or replacement costs.
Repainting old floors is a hectic step especially in case there is old paint in question. If you need the new stain to remain glued to the floor, you need adequate preparations and appropriate steps.
Planning
Painting floors require proper planning. Typically, one needs to move additional objects from the areas to be painted, as well as find an alternative room or space to spend time while the painted floors dry off after painting. In addition to this, you need a conducive weather condition for the painted floors to dry off completely. Therefore, a humid climatic condition is far from recommended, as it would keep the paint tacky.
Selecting your paint
Standard oil-based enamel and oil-based porch or floor paints are the best. Although these are not ideal makeup products to go for, the have the ability to withstand the greatest foot traffic you would possibly have on the floors. Other paints are environment-friendly but less durable.
How to stain wooden floors
Before you begin painting, ensure that your floor has no traces of wax. You may alternatively opt to the removal of such if it exists before commencing. Stick to these steps when staining your floors.
Step one: Rough up your surface. Do this using a 150-grit sandpaper with the aid of a square pad sander, or manually. There is no need to sand it completely as the aim is only to remove the glossy top finish from the floor.
Step two: Clean the floor. Vigorously vacuum the floor then damp-mop it to get rid of any dust. Ensure the floor is spotless then leave it to dry.
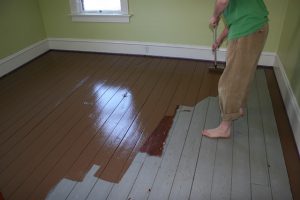
Step three: Apply the first coat of paint. For this process, you only need to aim at achieving a thin coat of paint using a roller or brush. Both serve the purpose when but at different speeds. Begin by cutting carefully on the edges and corners, and then use a roller or brush to finish your way towards the door. Gove the paint enough time to dry off for 24-48 hours.
Step four: smoothen the dry layer of paint. Using a 220-grit sandpaper, smoothen the surface and remove any grain particles and dust.
Step five: Paint the second layer color coat. In the same way, you applied the first coat, apply the second coat towards the door and leave the floor to dry. For the second layer of skin, you can allow it up to three days to dry.
Step six: Add a decorative touch. After the base coat is properly set, you are now free to add up any extra decorations you so desire. Even as you do this, pay keen attention to the type of tape you use to avoid pulling off the hard worked on paint.
Step seven: Optionally, seal the floor. Do this in areas that experience abnormal traffic rates. Clear polyurethane does the trick.
Step eight: let paint heal or cure. You will need some extra weeks for the paint to cure completely and the smell to disappear completely.